Thursday, December 31, 2015

NoTilt pinball

I released Rhino Roll my previous game on the 18th December 2015, I then set myself a target to release a new game by the end of the year.
Rhino Roll on GooglePlay
Rhino Roll get it on GooglePlay

My new game is called NoTilt pinball and relies heavily on my 1st game Shuffa ball's mechanics. 

 NoTilt get it on GooglePlay
NoTilt Pinball get it on GooglePlay

Here it is like a traditional pinball game with bumpers, triggers and slingshots. The one thing missing is the flippers. You use the table itself to control the ball. Watch the trailer video to see it in action.


Sunday, December 6, 2015

Creating a video game trailer using Movie Maker

To get your game noticed a lot of people say you need a trailer video for your game. I don't know if that is true but here is how I went about making the trailer.

Rhino Roller trailer

To do that I used Movie maker for editing, Open broadcast software (OBS) for the screen capture and Spriter and Inkscape for the logo animations.

Logo animations

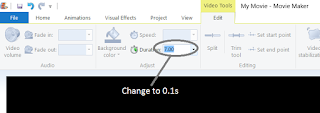
To do the logo I used Inkscape to create PNGs, then in Spriter I created an animation for the logo. Then I exported the animation to multiple PNGs which I then imported into Movie Maker, changed the time to display each frame to 0.1s.

Dragging multiple .PNGs into Movie Maker


Change dsiplay time


Game Play

To capure the game play I used OBS to screen capture. I turned the music off as that will be added later in Movie Maker. I edited multple shots of game play together and added to the main trailer project.

Music

I then added the music from the game itself into the video.


Click here to see the video

Monday, November 30, 2015

Rhino Roll

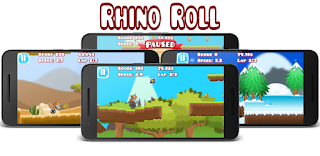
I've changed the name of Endless roller to Rhino Roll and it is now available for testing on Google Play.
It is a side scrolling platformer game.
To jump deform the ground and use as a trampoline.

Here are some screenshots of the game


Saturday, September 26, 2015

Adding a Font in Unity

So I was getting ready to release a version of my game Shuffa ball: Endless Roller onto game jolt for play testing. So I decided I needed to have text for the menus, I used a font I found in Inkscape and asked myself am I allowed to release a game using this font.
The font is called Showcard Gothic and it appeared it is not free to use commercially. So I needed to find a new font free to use in an application. I came across the site http://www.fontsquirrel.com/ that contains free to use fonts.
There I found this great cartoony font that fits perfectly with the cartoon style of my game. It is called Pusab and here is a picture of the level complete panel featuring the font.

Pusab font on level complete

In unity to use the font is really simple, just place the PUSAB___.otf file in the assets folder, then when using the text click the select font button.

Select font in Unity

Now I have a full level of the game to play, please play it and leave comments. It still isn't finished but it is getting there.

Tuesday, September 8, 2015

Unity Editor scripting: How to create levels

So in creating the levels I came across a problem.

It was really difficult to set up a level. Moving all of the tiles about was really difficult as they are inside a game object. Each parent objects has 4 sprites, a ceiling a floor, a top and a middle. These can all be assigned different Y axis positions.
What I really needed was a way to select multiple parent GameObjects then somehow manipulate them all in one go. So the way I’ve achieved this is by editor scripting.

To do this I created a script it that goes into a special folder called Editor in the Assets directory, if the folder isn’t there create it.

At the top of the script we need to add.

using UnityEditor;


We need to add the attribute for the menu item;

[MenuItem("Adz/Floor/UP/FloorUP")]

This allows us to change the IDE of unity to have our special function available as a menu item.
To run the function we select multiple GameObjects then click the FloorUp function.

Multiple GameObjects selected with new Menu items in IDE 

Here is the code for the FloorUp function, it loops through all of the items selected in the scene view, in order of the transform’s X position and increases their y by .1f.

   static void FloorUP()
        var items = Selection.gameObjects.OrderBy(go => go.transform.position.x);

        foreach (var item in items)
        {
            anchor p = item.GetComponentInChildren<anchor>();
            p.FloorTileY += .1f;
        }
    }

After clicking the menu item FloorUp we see the effect on the selected GameObjects, it gives us a ramp going upwards.

After the editor script FloorUp is run

So then all I did was create similar functions for the ceiling, Top, Middle sprites then I could easily create levels for the Shuffa ball: Endless roller game.


Sunday, August 30, 2015

Desert Tile Set for Endless Roller

Here for my game in development, Endless Roller, I've updated it to use gameart2D.com's desert tile set.
It just adds the professional quality.

I was sick at looking at my done in 5mins crappy artwork and saw that the site http://www.gameart2d.com/freebies.html has a number of freebies to use.

To use in my game I used Inkscape and did as I explained in my blog creating scrollable background tiles. I increased the number of tiles used by 5 as I thought it looked better in the game. I added a new layer called Desert, this means I just hide my old background layer and Inkscape will only export the desert layer. If I want to go back and use the crappy versions I can unhide the desert layer and show the original background layer.

Background tiles selected ready for export.

This background is much taller than the other backgrounds. This is because I've changed the game so that the camera will follow the Rhino as he goes up in the air.

Middle background layer

Front background layer


video on Youtube of the new desert tile set in action.


Monday, August 17, 2015

New Main menu for Shuffa ball

I decided to update the UI of my original game Shuffa ball. Previously there was 21 levels in one large scroll rect and it often seemed slow on startup.

So the idea is to have a main menu from which we can choose one of the 5 campaigns. It should also have the Settings and About links as well as an Exit button.

So in Inkscape I went about creating the assets to be used.

First off there needs to be a background, one of the filters I use in the design of the game graphics is Bevels->Combined Lighting. So what I do is apply that filter to the background then cut-out the buttons which gives a nice sunken feeling to the buttons.


To do a cut-out, make a shape on top of the background then Path->Difference (Ctrl+-).


 Here is how my main menu looked after all of the cut-outs.

I then hooked up all of the buttons for the level selection, they all call the old main menu, but I set which difficulty level is to be used.

New Main menu in action.

Then in the old a subset of the levels is displayed.

 Easy levels selected

By splitting the menu system into 2 Screens, I believe the menu system is simple on the main menu and is less cluttered on the level selection.