Showing posts with label Spriter2D. Show all posts

Sunday, December 6, 2015

Creating a video game trailer using Movie Maker

To get your game noticed a lot of people say you need a trailer video for your game. I don't know if that is true but here is how I went about making the trailer.

Rhino Roller trailer

To do that I used Movie maker for editing, Open broadcast software (OBS) for the screen capture and Spriter and Inkscape for the logo animations.

Logo animations

To do the logo I used Inkscape to create PNGs, then in Spriter I created an animation for the logo. Then I exported the animation to multiple PNGs which I then imported into Movie Maker, changed the time to display each frame to 0.1s.

Dragging multiple .PNGs into Movie Maker


Change dsiplay time


Game Play

To capure the game play I used OBS to screen capture. I turned the music off as that will be added later in Movie Maker. I edited multple shots of game play together and added to the main trailer project.

Music

I then added the music from the game itself into the video.


Click here to see the video

Wednesday, August 5, 2015

Rhino animations and transitions

To the Rhino sprite I want to add 3 things.

  • A sprite to represent the dust as the wheel turns on the ground.
  • A Dust explosion when the ball takes off and lands.
  • The third is more difficult I want the whole Rhino sprite to be angle differently when it takes off and lands.

Rhino Revving, taking off and landing

Revving Sprite

This blog will be about adding the revving sprite to the Rhino ball.

Again I’m going to use Spriter by BrashMonkey, and the Dust.scml from the Game effects artpack.

It has 2 animations the Rev sprite and the landing sprite, I’ll export them to separate PNG files like I did previously. Then drag them onto the hierarchy to create the animation.

If we were to attach to the wheel as a child the rev sprite would rotate with the ball. We could attach the sprite to the Rhino head as that is doesn’t move much but as with the flame sprite I’m going to use the Update function to position relative to the centre of the ball.
Unlike the flame sprite we need to apply an offset as the rev needs to appear on the left of the Rhino ball. To find the offset make the Rev temporarily a child of the Rhino ball then move to the ideal position, store the transform position as this is what we’ll add in the Update function. Remembering to move the Dust_000 from the RhinoBall hierarchy.

adjusting the transform of the Rev sprite

adding the sprite to the Rhino script

So the Rev sprite now works and is well positioned but the problem is when the Rhino jumps and is airborne there shouldn’t be dust revving. So as with the flame in the previous blog we will RayCast down from the centre of the ball to see when we lose contact with the ground.
If we lose contact we set active of the Rev GameObject to false, in the future we will transition from the Rev sprite to the take-off sprite but this will do just now.

Saturday, August 1, 2015

Bouncy fire-starter

As I've chosen a Rhino and as we all know they live to put out fires, I've now come up with a goal of the game.
The Shuffa ball instead of being the main player becomes the fire-starter, bouncy fire-starter. The Rhino then has the task of putting these fires out.

For the animation of the fire I use a package I bought called Spriter by BrashMonkey, when I bought it all of the artpacks were included. It is free to try and I do recommend it.
The one I am going to use comes from the Game effects pack and is called flame.scml.
Once opened; Click File->Export Animation to PNG.

Export animation

Then I set the size to 200% and the number of frames to export, in my case 9. You obviously will play about with these figures depending on the project. 

Exporting flame frames

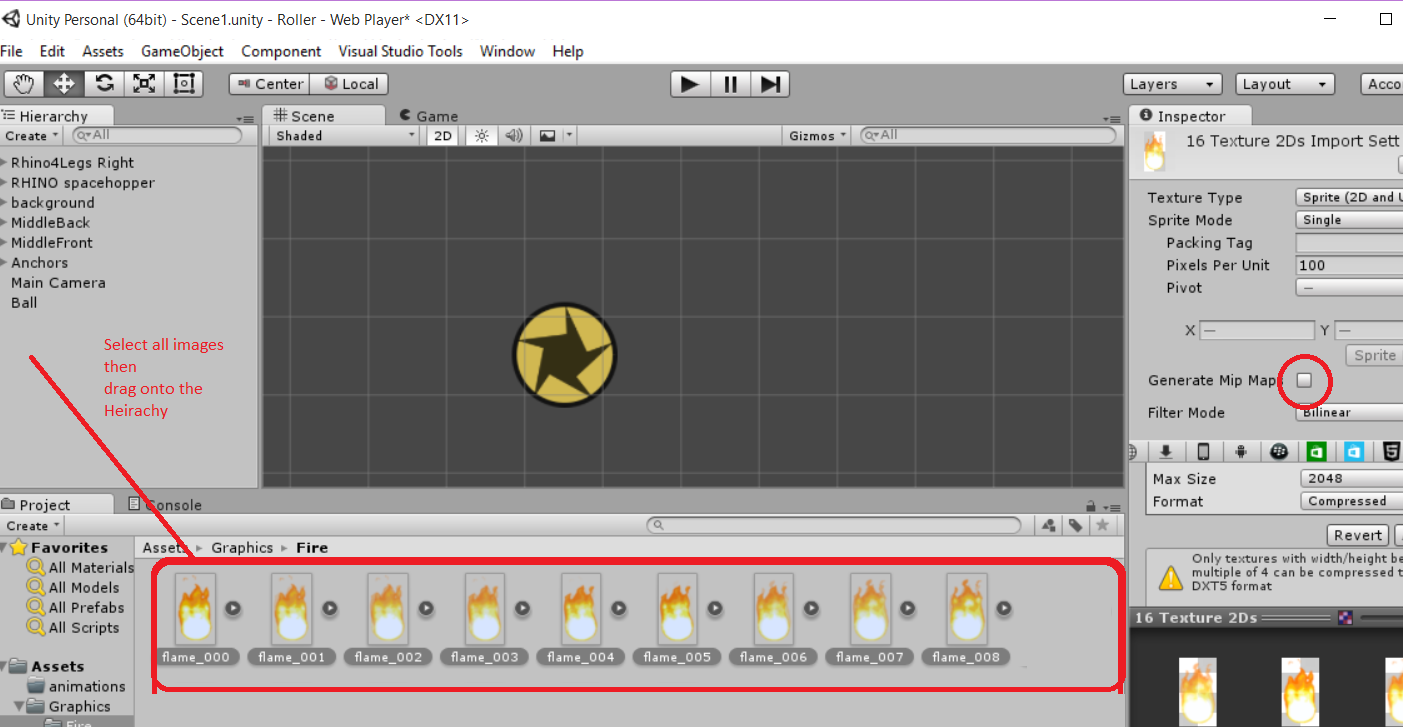
These need to be exported into a directory inside the Assets directory of the unity project. Then to create the animation you drag all of the images onto the Hierarchy, this creates the animation. One thing I like to do is un-check the "Generate mip-maps", I'm not sure what this is for but it just seems to create a lesser quality animation.


Drag images to Hierarchy

Now to make the flame follow the ball:
If you drag the flame onto the ball it becomes a child of that object and therefore as the ball rotates the so will the flame animation. Not the effect I'm after, so we need to create a script that as the ball moves the flame animation is also moved.
To do that we create in the ball script we a public GameObject that in the update we change the transform position to match that of the ball.

Ball script with GameObject

Back in the unity editor drag the flame_007 object into the fire, make sure the flame object is no longer a child of the ball.

Now we have a flame object that follows the ball, because the flame animation is much taller the middles do not line up.
Misaligned images

In the Update of the ball we could add an offset to the transform position but later on I want to change the rotation of the flame depending on whether it is airborne or rolling on the ground. So the easiest way is to change the pivot point of each frame in the animation.
Navigate in the Project to the directory where the individual PNG files are store then click on each on and in the sprite editor change the pivot point.

Changing pivot point of each sprite

Aligned ball and flame.